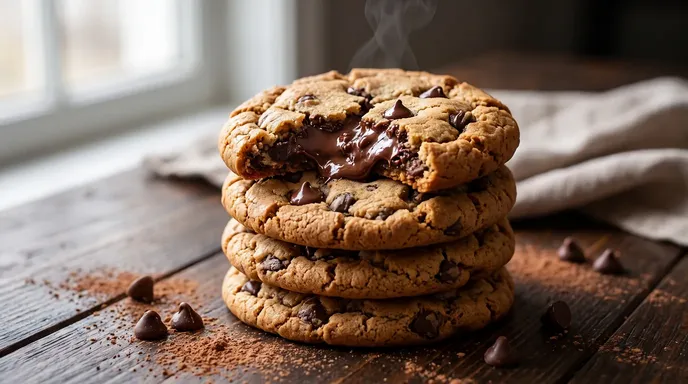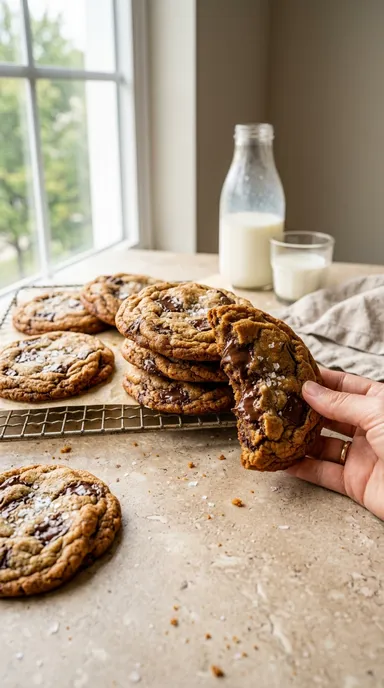
galleta receta is the formula I use when I want a cookie with three distinct textures in one bite: a thin, crisp edge, a chewy ring just inside it, and a soft center that stays tender after cooling. The recipe is built around browned butter, a higher proportion of brown sugar than white sugar, one whole egg plus an extra yolk, and a short refrigerator rest. Those choices are not decorative. Browned butter removes water and develops toasted milk solids, brown sugar contributes hygroscopic molasses that holds moisture, and the extra yolk supplies fat and emulsifiers without adding the extra water found in another egg white. The result is a dough that spreads in a controlled way rather than becoming cakey or greasy.
This galleta receta also treats temperature as an ingredient. Warm dough spreads before its flour structure can set, while very cold dough can stay too thick and bake unevenly. I chill the mixed dough for at least one hour, then portion it and let the scoops sit at room temperature for about 8 to 10 minutes while the oven fully preheats. At 180°C, the outside begins setting while the center still has time to spread. You are looking for edges that turn medium golden brown and a center that appears slightly underbaked, with a matte ring around a glossier middle. The cookies finish cooking from stored heat on the tray.
Chocolate is chopped rather than used only as chips because irregular pieces create both molten pockets and fine shards that season the dough with cocoa. A small amount of flaky salt added after baking sharpens the butter and caramel notes without making the cookie taste salty. This galleta receta makes eight large cookies, enough for four servings at two cookies each, and every measurement is given by weight where precision actually matters. The method is simple, but the useful part is understanding why each cue matters, so you can correct the dough before an entire tray goes wrong.
How I Dialed In the Chew, Spread, and Caramel Flavor
I developed this galleta receta around the point where browned butter smells like toasted hazelnuts but has not crossed into bitterness. The change happens quickly. At first the butter foams loudly, then the bubbling becomes finer as its water cooks away. After several minutes, the foam thins enough to reveal amber milk solids collecting on the bottom of the saucepan. I pull the pan when those specks are chestnut brown and the aroma shifts from plain melted butter to toasted milk and caramel. If the solids are black rather than brown, the butter tastes acrid, and no amount of chocolate can hide it.
My first version of this galleta receta spread into thin, lacy disks. I had mixed the sugar into butter that was still hot, then baked the dough almost immediately. The centers looked glossy and promising after six minutes, but by ten minutes the edges had merged into a flat ring and the underside was much darker than the top. The fix was not simply adding more flour. I cooled the browned butter until it felt just warm, not hot, and gave the finished dough a one-hour chill. That let the flour fully hydrate and the butterfat firm enough to delay spread during the first few minutes in the oven.
The next test taught me how much visual timing matters. I initially waited until the centers looked fully baked before pulling the tray, which produced cookies that were crisp from edge to edge after cooling. Now I remove them when the outer 2 centimeters are golden and set, but the centers still look slightly puffed and soft. When I tap the baking sheet, the middle trembles faintly while the edge stays in place. After five minutes on the hot tray, the center loses its wet shine and settles into shallow wrinkles. That carryover cooking gives this galleta receta its chewy middle instead of a dry, biscuit-like crumb.
I also changed the chocolate after testing. Uniform chips gave predictable dots of chocolate, but the cookie tasted less integrated because each bite alternated between plain dough and a whole chip. Chopped dark chocolate leaves large molten pieces, medium chunks, and tiny cocoa-rich fragments. Those smaller shards partially melt into the dough and deepen the flavor between the bigger pockets. I now press a few reserved chocolate pieces onto each portion before baking, then finish with a small pinch of flaky salt while the surface is still warm. That combination gives the galleta receta a toasted aroma, crisp perimeter, flexible center, and uneven chocolate distribution that feels deliberate rather than factory-perfect.
Prep Time: 25 minutes, plus 1 hour chilling | Cook Time: 10-12 minutes per tray | Servings: 4
Ingredients
- 115 g unsalted butter
- 130 g light brown sugar, packed
- 55 g granulated sugar
- 1 large egg, room temperature
- 1 large egg yolk, room temperature
- 1 teaspoon pure vanilla extract
- 170 g all-purpose flour
- 1/2 teaspoon baking soda
- 1/2 teaspoon fine sea salt
- 140 g dark or semisweet chocolate, roughly chopped
- Flaky sea salt, optional, for finishing
Instructions
- Brown the butter: place the butter in a light-colored saucepan over medium heat. Cook, swirling often, until the loud bubbling quiets, the milk solids turn chestnut brown, and the butter smells nutty, about 4 to 6 minutes. Immediately pour it, including the browned solids, into a heatproof mixing bowl.
- Cool the butter for 10 to 15 minutes, until it is warm rather than hot. Add the brown sugar and granulated sugar, then whisk for about 30 seconds until the mixture looks glossy and evenly combined.
- Whisk in the whole egg, extra yolk, and vanilla for 45 to 60 seconds. The mixture should become smoother, slightly thicker, and lighter around the edges; this brief emulsification helps the fat and water stay evenly dispersed.
- In a separate bowl, whisk the flour, baking soda, and fine salt. Add the dry ingredients to the butter mixture and fold with a flexible spatula until only a few flour streaks remain.
- Fold in about 110 g of the chopped chocolate. Stop mixing as soon as the flour disappears; overmixing after hydration develops more gluten and can make the cookies tougher.
- Cover the dough and chill for at least 1 hour and up to 24 hours. Chilling firms the butterfat, hydrates the flour, and gives the sugar time to dissolve more completely, improving both flavor and controlled spread.
- Heat the oven to 180°C conventional or 170°C fan. Line a heavy, light-colored baking sheet with parchment. Portion the dough into 8 balls of about 70 to 75 g each, spacing them at least 7 cm apart.
- Press the reserved chocolate onto the tops. Bake one tray at a time for 10 to 12 minutes, rotating once if your oven has a hot spot. Remove the tray when the edges are medium golden but the centers still look slightly soft and underdone.
- Let the cookies rest on the hot tray for 5 minutes. If a cookie is irregular, place a round cutter slightly larger than the cookie around it and gently circle the warm cookie to neaten the edge without compressing the center.
- Transfer to a wire rack. Add a tiny pinch of flaky salt while the chocolate is still soft, then cool for at least 10 more minutes before eating so the center can finish setting.
Why This Galleta Receta Works
The structure of this galleta receta starts with water management. Butter is roughly a mixture of fat, water, and milk solids. Browning drives off part of that water while toasting the milk proteins and sugars through Maillard reactions. Less water means less steam and slightly less gluten development, both of which favor a denser, chewier cookie rather than a cakey one. The toasted milk solids add a nutty, caramel-like flavor that plain softened butter cannot provide. Because browned butter is liquid, however, it must cool before mixing or the dough will spread too quickly in the oven.
The sugar ratio is equally intentional. Brown sugar contains molasses, which contributes both acidity and moisture-retaining sugars. That moisture retention helps the center of the galleta receta remain flexible after the cookies cool. Granulated sugar, by contrast, encourages spread and crispness because it dissolves into a syrup that sets into a brittle structure at the edges. Using more brown sugar than white sugar gives a cookie that still develops a crisp perimeter without drying all the way through. If you replace all the brown sugar with white sugar, expect a thinner cookie with a sharper snap and less chew.
The whole egg and extra yolk solve another texture problem. Egg white brings water and proteins that set firmly when heated, while yolk brings fat, lecithin, and proteins that give richness and emulsification. Adding a second whole egg would introduce enough extra water to push the galleta receta toward a puffier, more cake-like texture. The extra yolk gives tenderness and chew without that moisture load. Whisking the egg mixture into the cooled butter and sugar for about a minute creates a more stable emulsion, so the fat does not leak out around the cookies as they bake.
Chilling the dough does more than make it firm. During the rest, flour particles absorb water from the egg and dissolved sugars, which reduces a raw flour taste and gives the finished cookie a more cohesive crumb. Sugar also continues dissolving, which can improve browning and create a smoother interior texture. In this galleta receta, one hour is enough to control spread, but 12 to 24 hours gives a deeper caramel flavor. Beyond about 48 hours, the surface can begin drying unless the dough is sealed very well, so longer is not automatically better.
Finally, the baking time is designed around carryover heat. A cookie taken from the oven only when its center looks fully dry will continue cooking on the hot tray and usually become too crisp. The best endpoint for this galleta receta is a medium-golden edge with a center that looks slightly underdone. The internal structure continues setting for several minutes because the tray and the cookie itself retain heat. This is why cooling on the sheet for five minutes is part of the cooking process, not an optional waiting period. The center should settle, wrinkle slightly, and become chewy rather than raw.
Key Ingredients and Smart Substitutions for Galleta Receta
Flour determines how much structure this galleta receta can support. Standard all-purpose flour, usually around 10 to 11.5 percent protein, gives enough gluten for chew without turning the cookie tough. Bread flour can be substituted for up to half the all-purpose flour if you want a noticeably chewier center, but using only bread flour can make the edge feel hard after cooling. Cake flour moves in the opposite direction because its lower protein level produces a more tender, fragile cookie. Whatever flour you use, weigh it. Scooping directly from a bag can compact enough flour into a cup to change the dough dramatically.
Butter supplies flavor, spread, and tenderness. Unsalted butter is useful because it lets you control the salt level, but salted butter can work if you reduce the added fine salt. European-style butter often contains slightly more fat and less water, which can make the galleta receta spread a little differently after browning. If you use it, watch the first tray before changing the formula. Margarine is not an equivalent substitution because its fat and water composition varies widely. Coconut oil can make a good cookie, but it removes the browned-milk flavor and may create a greasier mouthfeel because it melts differently from butter.
Brown sugar is not just white sugar dyed brown; the molasses changes acidity, moisture retention, and flavor. Light brown sugar gives a balanced caramel note, while dark brown sugar makes the galleta receta more molasses-forward and slightly softer. If you have only white sugar, you can still bake the cookies, but they will be crisper and paler in flavor. Muscovado is powerful and moist, so I would replace only part of the brown sugar with it. A 30 to 40 percent substitution is enough to add dark toffee notes without making the dough excessively sticky.
Chocolate percentage changes both sweetness and melt. A 60 to 70 percent dark chocolate balances the sweet dough and gives broad molten pockets. Milk chocolate works, but it makes the galleta receta noticeably sweeter, so I would reduce the granulated sugar by 10 to 15 grams. Commercial chocolate chips contain stabilizers that help them hold their shape, which is useful if you want defined pieces but less useful if you want fluid pools. Chopped bar chocolate gives more irregular melting. You can combine both if you want structure from chips and molten streaks from chopped chocolate.
Vanilla and salt should be treated as flavor controls, not background ingredients. Pure vanilla rounds out the browned butter and chocolate, while fine salt in the dough reduces perceived sweetness and sharpens cocoa flavor. The optional flaky salt on top works differently because it creates brief bursts of salinity on the tongue. For this galleta receta, use it sparingly. If every bite tastes salty, you have lost the contrast. Nuts such as toasted pecans or walnuts can replace up to 40 grams of chocolate without changing the dough structure, but cool them completely before folding them in so they do not warm and soften the dough.
Step-by-Step Technique for Bakery-Style Galleta Receta
Start this galleta receta with a light-colored saucepan so you can actually see the milk solids changing color. Dark pans hide the point between brown and burnt. Melt the butter over medium heat, then keep it moving by swirling the pan every 20 to 30 seconds. The butter will foam as water escapes. When the sound softens and the foam becomes finer, look through it at the bottom. The solids should be chestnut brown, not black, and the aroma should resemble toasted nuts. Pour the butter out immediately because the hot pan can continue cooking the solids even after leaving the burner.
Cooling the browned butter is the first major spread-control step. Ten to fifteen minutes is usually enough in a room-temperature bowl, but the real cue is tactile: the butter should feel warm, not hot, when you touch the outside of the bowl. Whisk in the two sugars, then add the whole egg, extra yolk, and vanilla. For this galleta receta, whisk for about 45 to 60 seconds rather than several minutes. You want a smooth emulsion, not a foamy egg mixture. Excess aeration can make the cookies puff and then collapse unpredictably.
Add the dry ingredients only after whisking them together separately. This distributes the baking soda and salt before they enter the wet mixture. Fold with a flexible spatula, scraping from the bottom and turning the dough over itself. Stop when only two or three small flour streaks remain, then fold in the chocolate and finish mixing at the same time. The galleta receta dough should look glossy and thick, not dry or crumbly. If it is loose enough to pour, the butter was probably too warm and the dough needs chilling before you judge its final consistency.
After one hour in the refrigerator, portion the dough by weight for even baking. Balls of 70 to 75 grams make large cookies with enough mass to keep the center soft while the edge browns. If you make 35-gram cookies, reduce the baking time because the center heats much faster. Place the portions on parchment over a heavy, light-colored baking sheet. Dark nonstick sheets absorb more radiant heat and can overbrown the bottom of a galleta receta before the top is ready. Silicone mats also reduce spread slightly compared with parchment, so use the same surface every time if you want repeatable results.
Bake at 180°C conventional or 170°C fan, one tray at a time if possible. The ideal endpoint is not a uniform brown surface. The outer ring should be medium golden and matte, while the center remains paler and slightly glossy. If your oven has a strong hot spot, rotate the tray once around minute seven, not repeatedly, because every door opening drops oven temperature. When the galleta receta comes out, leave it on the tray for five minutes. That rest lets the melted sugar and fat set enough for transfer while the residual heat finishes the soft center without drying it.
Common Cookie Mistakes and How to Fix Them
If your galleta receta spreads into thin puddles, start by checking temperature before adding more flour. Dough made with hot browned butter is the most common cause because the fat melts before the cookie structure can set. Chill the dough until firm, then bake one test portion. If it still spreads too much, verify that you weighed the flour and that your baking soda is measured accurately. Adding random flour can rescue shape but often creates a dry, bready cookie. A test cookie gives you information without sacrificing an entire tray.
If the cookies barely spread, the dough may be too cold, over-floured, or baked on a surface that limits spread. Let chilled portions sit at room temperature for 8 to 10 minutes before baking. A very stiff galleta receta can also result from packed cup measurements of flour, which is why weight is safer. If your first test cookie remains tall and domed, gently flatten the remaining dough balls into thick disks before baking rather than changing the formula mid-batch. Also check oven temperature with an independent thermometer; an oven running cool can delay spread and give a pale, dense result.
Dry cookies usually mean overbaking rather than insufficient butter. The center should look slightly underdone when the tray leaves the oven. If you wait until the entire top is evenly browned and matte, carryover heat will push the galleta receta beyond the chewy stage. Reduce baking time by one to two minutes on the next tray. Also remember that smaller cookies bake faster. If you portion by eye and end up with several sizes, the small ones may be crisp before the large ones are ready. A scale is faster than trying to rescue mixed sizes later.
Greasy cookies can come from a broken emulsion or butter that was too warm. When egg meets very hot fat, the mixture does not bind as smoothly, and fat can leak from the dough in the oven. Let the browned butter cool, use room-temperature eggs, and whisk until the mixture looks homogeneous before adding flour. If the raw galleta receta dough appears shiny with visible oil around the edges, chill it longer. Do not add flour immediately. Once the fat firms and the flour hydrates, the dough may return to the correct consistency without changing the ingredient balance.
Uneven browning often comes from the baking sheet or oven rather than the recipe. Thin black trays can scorch bottoms, while stacking two trays can insulate the base if that is your only equipment option. If the bottoms of your galleta receta are dark while the tops remain pale, move the oven rack one level higher and use a lighter tray. If one side browns faster, rotate the tray once during baking. Burnt edges with a raw center usually mean the oven is too hot. A cheap oven thermometer often explains more cookie failures than any ingredient substitution does.
Variations and Adaptations That Keep the Texture Intact
The safest way to vary this galleta receta is to change inclusions rather than the core ratio of fat, sugar, flour, and egg. Replace up to 40 grams of the chocolate with toasted nuts, cacao nibs, or chopped dried fruit. Pecans and walnuts work especially well because their bitterness balances the sweet dough. Toast nuts at 160°C until fragrant, usually 6 to 10 minutes depending on size, then cool them fully. Warm nuts soften the dough and can undo part of the chilling work. Keep the total inclusion weight close to the original so the cookies spread consistently.
For a chocolate-cookie version, replace 20 grams of flour with 20 grams of unsweetened cocoa powder rather than simply adding cocoa on top of the formula. Cocoa absorbs water strongly, so adding it without removing flour can make the galleta receta dry and thick. Dutch-process cocoa gives a darker, smoother flavor, while natural cocoa tastes brighter and more acidic. Because baking soda reacts partly with acidity, the choice can affect spread slightly. If you want a predictable first attempt, use Dutch-process cocoa and keep the rest of the leavening unchanged.
For citrus, add finely grated zest to the sugar before mixing. Rub orange or lemon zest into the granulated sugar with your fingertips for about 30 seconds; the sugar crystals rupture the zest’s oil glands and release aroma. One teaspoon of zest is enough for this batch. Avoid pouring significant lemon juice into the galleta receta because extra water and acid change both spread and baking soda behavior. If you want more citrus impact, pair zest in the dough with a small amount of candied peel or chopped dark chocolate rather than adding liquid.
Spices work best when added to the dry ingredients so they disperse evenly. Cinnamon, cardamom, ginger, or espresso powder can all change the profile without disturbing structure. For a warm-spice galleta receta, start with 1/2 teaspoon cinnamon plus 1/4 teaspoon ground cardamom. Strong spices become more noticeable after baking, so restraint matters. Espresso powder does not make the cookie taste strongly of coffee at a small dose; 1/2 teaspoon mainly deepens chocolate flavor. Above 1 teaspoon, the coffee becomes a clear part of the flavor profile.
Gluten-free adaptation requires more than replacing flour spoon for spoon unless your blend is designed for cookies. A commercial 1-to-1 blend containing rice flour, starches, and a binder can work, but different brands absorb water differently. Chill the gluten-free galleta receta dough for at least two hours because rice-based flours hydrate more slowly. Bake one test cookie and adjust only after seeing its spread. If it is gritty, more resting time is usually more useful than more fat. If it spreads excessively, chill longer before adding extra flour, because many gluten-free blends become noticeably firmer as they hydrate.
Storage, Make-Ahead Dough, Freezing, and Reheating
A baked galleta receta keeps best at room temperature in an airtight container once the cookies are completely cool. Trapping warm cookies creates condensation, which softens the crisp edges and can make the surface tacky. Let them cool on a wire rack until no warmth remains in the center, usually 30 to 45 minutes for large cookies. Store them with a sheet of parchment between layers if the chocolate is very soft. At room temperature, the texture is best during the first three days, though the cookies remain usable longer if they are kept dry and sealed.
The dough is even more useful as a make-ahead component. After mixing, chill the galleta receta dough for one hour, portion it into balls, and refrigerate the portions in an airtight container for up to about 48 hours. This rest deepens caramel notes because flour hydration and sugar dissolution continue slowly. Pressing the chocolate onto the top before storage is fine, but flaky salt should wait until after baking. If the dough balls become very hard in the refrigerator, let them sit at room temperature for 10 to 15 minutes before baking so the centers and edges begin at a more even temperature.
For longer storage, freeze portioned raw dough rather than a whole block. Arrange the galleta receta portions on a parchment-lined tray, freeze until firm, then transfer them to a sealed freezer bag or container. Freezing individually prevents the portions from sticking together and lets you bake only what you need. For best flavor, use the frozen dough within two to three months. Bake from frozen by adding roughly two to three minutes to the baking time, but watch the visual cues. A frozen center can stay tall, so lightly flatten each ball before baking if you prefer a wider cookie.
Reheating baked cookies can restore contrast between a crisp edge and soft center. Place a room-temperature galleta receta on a tray in a 160°C oven for 3 to 5 minutes, then let it stand for 2 minutes before eating. The short heating melts some chocolate and softens the interior without drying the cookie significantly. A microwave works faster but changes the texture differently. Ten to fifteen seconds makes the center soft, but it does not re-crisp the edge and can make the cookie rubbery if overheated. For bakery-style texture, the oven is the better tool.
If the cookies have become soft from humidity, use a slightly longer low oven refresh rather than a hotter blast. About 5 to 7 minutes at 150°C can drive off surface moisture without aggressively darkening the sugar. Let the refreshed galleta receta cool for several minutes because the edge becomes crisp as the melted sugars reset. Do not refrigerate baked cookies unless your room is unusually hot; refrigeration speeds starch retrogradation and can make baked goods seem stale faster. Freeze for long storage, or keep properly sealed at room temperature for short storage.
Serving Suggestions, Pairings, and Texture Timing
The best serving window for this galleta receta is about 15 to 25 minutes after baking. At that point the chocolate is still soft, the center has finished setting, and the edge has become crisp enough to contrast with the chewy interior. Straight from the oven, the cookie is structurally fragile and the center can seem greasy because the fat has not reset. Fully cold, the flavor is still excellent but the chocolate firms and the butterfat becomes less aromatic. If you are serving guests, bake the final tray shortly before dessert and let the cookies rest while coffee or tea is prepared.
Milk is an obvious pairing, but temperature matters. Very cold milk exaggerates the contrast with a warm galleta receta and clears melted chocolate from the palate. Coffee works for a different reason: bitterness balances sugar and amplifies the toasted notes from browned butter. A medium-roast filter coffee is often better than an intensely dark roast because it does not bury the vanilla and caramel. Black tea, especially Assam or Ceylon, gives tannin and malt notes that pair cleanly with chocolate without adding more sweetness.
If you serve the cookies as a plated dessert, keep the additions modest. One large galleta receta with a small scoop of vanilla ice cream creates useful temperature contrast, but add the ice cream at the last second so it does not soak the cookie before it reaches the table. A spoonful of lightly whipped unsweetened cream is another option because it softens perceived sweetness. Avoid pouring heavy caramel sauce over the top; the cookie already has deep caramel notes from brown sugar and browned butter, and extra syrup can make the dessert monotonously sweet.
For a more structured presentation, break one cookie in half while it is still slightly warm and lean the halves against each other so the interior crumb and chocolate pockets are visible. This is not merely decorative. The exposed center releases aroma faster than an intact cookie. A tiny pinch of flaky salt added after baking should remain visible in isolated crystals, not form a salty layer. In this galleta receta, the salt’s purpose is contrast. Each crystal should appear in only some bites so the palate alternates between sweet, bitter cocoa, toasted butter, and brief salinity.
Portion size also changes perceived texture. These 70- to 75-gram cookies are intentionally large because a larger diameter lets the outer edge become crisp while the middle remains chewy. If you serve two per person, one can be eaten warm and the other later at room temperature, which shows how the same galleta receta changes as the fat and chocolate set. For children or a buffet, you can make smaller portions, but reduce baking time and expect a higher edge-to-center ratio. Smaller cookies will naturally taste crisper even when made from the same dough.
Frequently Asked Questions
Why do my cookies spread too much in the oven?
Excess spread usually means the fat was too warm, the dough was not chilled long enough, or the flour amount was too low. In this <strong>galleta receta</strong>, browned butter is liquid, so cooling it before mixing and chilling the finished dough for at least one hour are essential. Bake one test cookie before changing the formula. If it still spreads into a thin disk, verify your flour by weight and check that the oven is truly at 180°C with an independent thermometer.
Why are my cookies thick and not spreading?
Cookies that stay tall can result from too much flour, very cold dough, or an oven that runs cool. Let the <strong>galleta receta</strong> portions sit at room temperature for about 8 to 10 minutes before baking, especially after an overnight chill. If the first test cookie remains domed, gently flatten the remaining dough balls into thick disks. Do not immediately reduce flour unless you know the original amount was measured accurately, because temperature alone often explains the problem.
Can I make this galleta receta without browning the butter?
Yes, but the flavor and spread will change slightly. Plain melted butter retains more water than browned butter, so the dough may be a little softer and the cookies can develop a different chew. If you skip browning in this <strong>galleta receta</strong>, melt the butter gently, cool it until just warm, and follow the same chilling step. The cookies will still work, but they will have a simpler butter flavor without the toasted hazelnut and caramel notes from browned milk solids.
How long should cookie dough chill before baking?
One hour is the practical minimum for this dough because it gives the flour time to hydrate and the browned butter time to firm. For deeper flavor, the <strong>galleta receta</strong> dough can rest for 12 to 24 hours in the refrigerator. Keep it tightly covered so the surface does not dry out. If chilled overnight, let the portions sit at room temperature for 10 to 15 minutes before baking so the outside is not soft while the center remains refrigerator-hard.
Can I freeze the cookie dough?
Yes, and portioning before freezing makes the dough much more useful. Chill and scoop the <strong>galleta receta</strong> dough first, freeze the balls on a tray until firm, then transfer them to an airtight bag or container. Bake from frozen, adding roughly two to three minutes and watching the edge color rather than relying only on the clock. Lightly flatten frozen portions if you want more spread, because a completely frozen center can keep the cookie thicker.
Why are my cookies hard after they cool?
The most common cause is overbaking. A <strong>galleta receta</strong> designed for a chewy center should leave the oven while the middle still looks slightly soft and paler than the edge. The cookies continue cooking on the hot tray for several minutes, so waiting until the center looks fully dry usually makes them crisp throughout. Also check portion size: smaller cookies need less time because heat reaches their centers more quickly.
Can I use chocolate chips instead of chopped chocolate?
Yes, but the eating experience changes. Chocolate chips contain stabilizers that help them keep their shape, while chopped bar chocolate creates large molten pockets plus tiny shards that partly melt into the dough. In this <strong>galleta receta</strong>, you can replace the chopped chocolate gram for gram with chips. For a useful compromise, use half chips and half chopped chocolate so you get defined pieces and irregular melted streaks in the same cookie.
What is the best oven temperature for chewy cookies?
For this formula, 180°C in a conventional oven or about 170°C in a fan oven gives the best balance of spread, browning, and a soft center. A hotter oven can set and darken the edge before the <strong>galleta receta</strong> has time to spread evenly. A cooler oven can make the cookies pale and allow excess spread before structure forms. Because household ovens often run inaccurate by 10°C or more, an inexpensive oven thermometer is one of the most useful baking tools.
Can I reduce the sugar in this cookie recipe?
You can reduce it slightly, but sugar controls structure as well as sweetness. In a <strong>galleta receta</strong>, sugar affects spread, browning, moisture retention, and edge crispness, so cutting a large amount can create a thick, dry cookie. A reduction of about 10 percent is a reasonable first test. If you want a less sweet result without changing structure as much, use darker chocolate and a tiny amount of flaky salt rather than removing a large portion of sugar.
How do I keep cookies soft for the next day?
Cool the cookies completely, then seal them in an airtight container at room temperature. The brown sugar in this <strong>galleta receta</strong> helps retain moisture, but exposure to dry air will still make the centers firmer. If you want to refresh a day-old cookie, warm it for 3 to 5 minutes in a 160°C oven and let it rest for 2 minutes. That softens the center and chocolate while allowing the edge to regain some crispness.